Milvus官方提供了单进程版本安装方式和K8s()的安装方式,但这种方式往往不利于生产环境的部署。
Milvus从2.6.0开始,其角色进行了大幅度调整,其架构由:
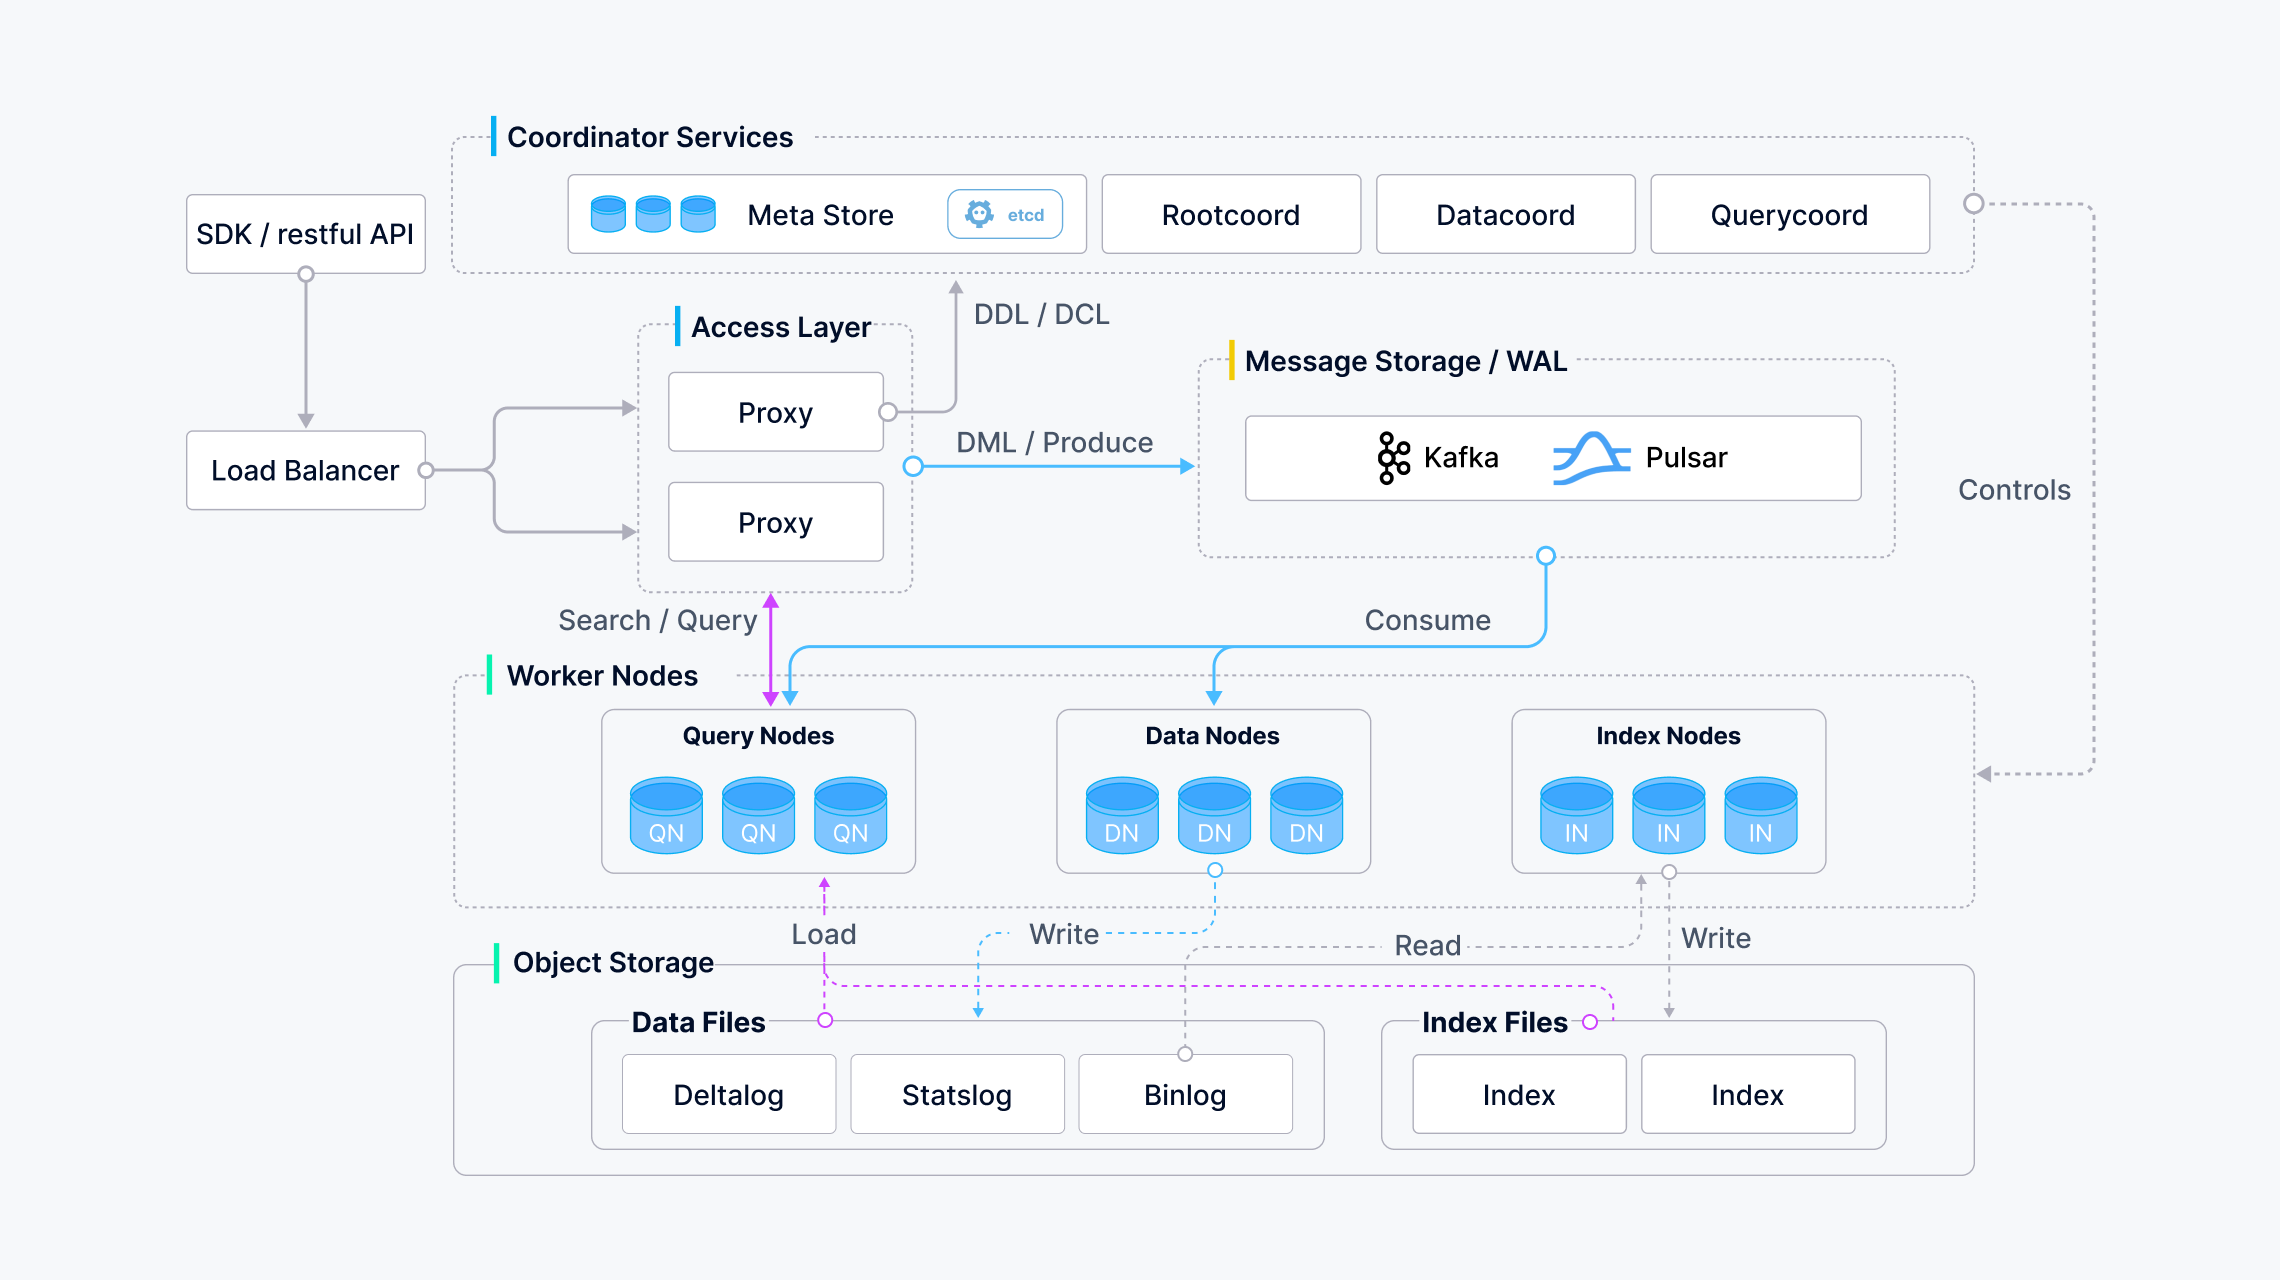
演化成:
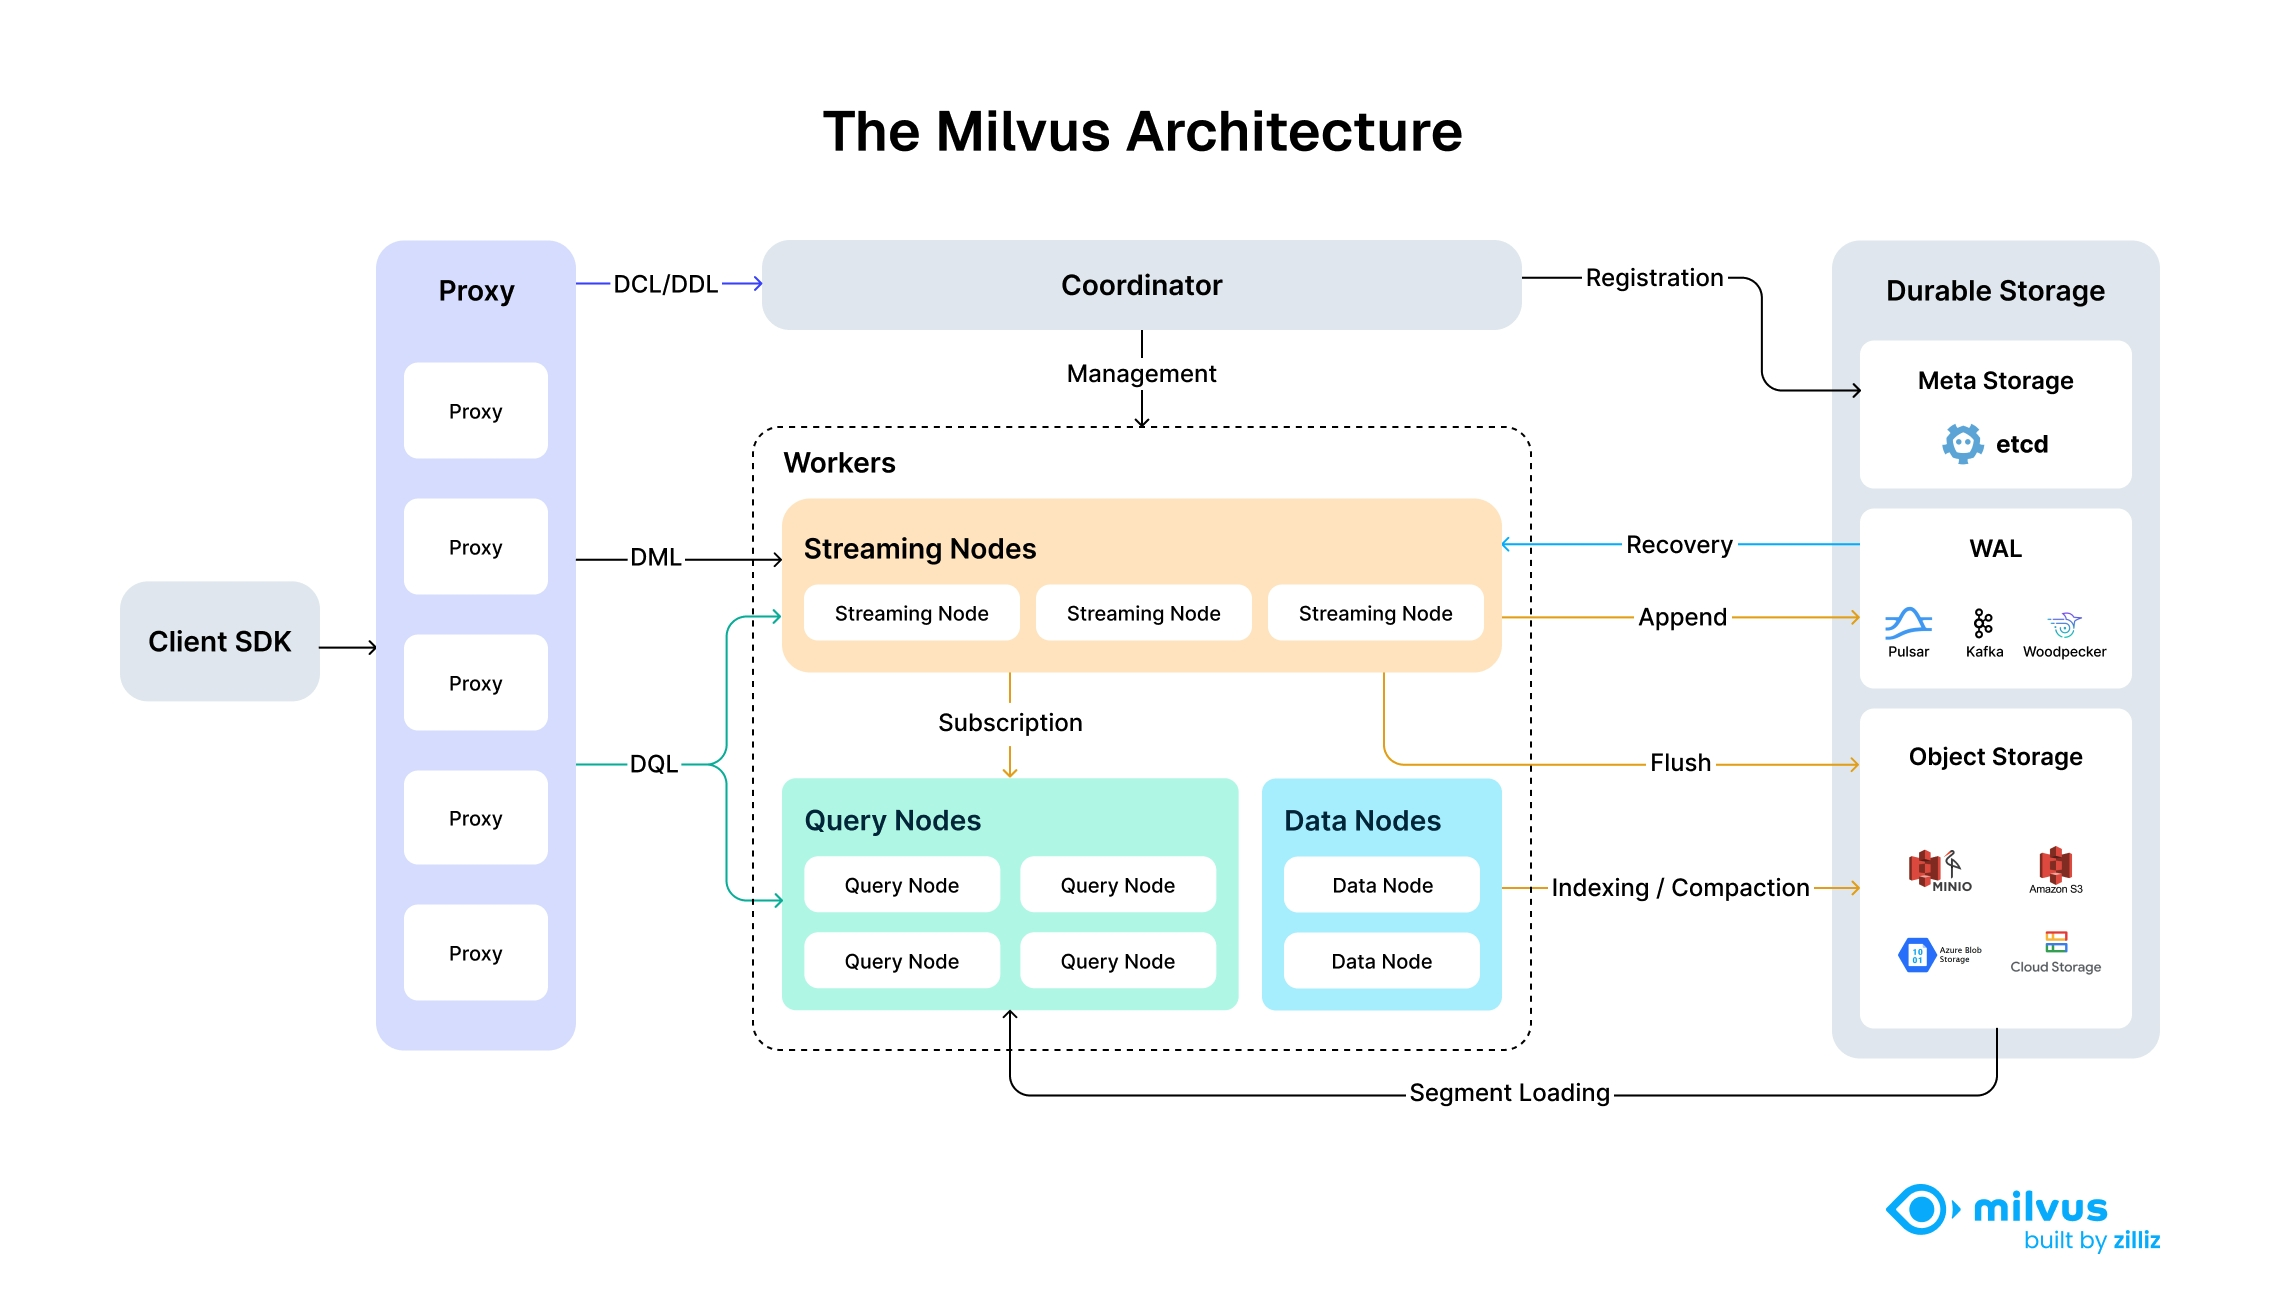
其部署方式也发生了变化。
写这篇文章希望能够细化到Milvus的部署和配置信息,并将Milvus相关依赖明细化,避免黑盒方式使用。
Milvus 2.6.x依赖主要有3个:
-
metastore:用来存储元数据信息,默认使用
etcd组件,可选tikv。metastore
typeetcd # Default value: etcd, Valid values: [etcd, tikv]
snapshot
ttl86400 # snapshot ttl in seconds
reserveTime3600 # snapshot reserve time in seconds
maxEtcdTxnNum64 # maximum number of operations in a single etcd transaction-
metastore这里选择了etcd组件。etcd组件采用docker安装方式,其
docker-compose.yaml如下:services
etcd
imagemilvusdb/etcd3.5.23
container_nameetcd
restartunless-stopped
ports
"2379:2379"
"2380:2380"
volumes
./etcd_data:/bitnami/etcd/data # 注意建立./etcd_data目录,并设置0700权限
environment
ETCD_NAME=etcd
ETCD_DATA_DIR=/bitnami/etcd/data
ETCD_LISTEN_CLIENT_URLS=http://0.0.0.0:2379
ETCD_ADVERTISE_CLIENT_URLS=http://0.0.0.0:2379,http://127.0.0.1:2379
ETCD_LISTEN_PEER_URLS=http://0.0.0.0:2380
ETCD_INITIAL_ADVERTISE_PEER_URLS=http://0.0.0.0:2380,http://127.0.0.1:2380
ETCD_ENABLE_V2=true
ALLOW_NONE_AUTHENTICATION=yes
healthcheck
test"CMD" "curl" "-f" "http://127.0.0.1:2379/health"
interval30s
timeout5s
retries3
logging
driver"json-file"
options
max-size10m
max-file"3"
networks
sheinnet_18 # 依赖的docker网络子网选择同一个,解决连通性问题
networks
sheinnet_18
externaltrue -
检验是否安装成功,运行下面命令:
 # docker exec -it etcd etcdctl member list
 17ac6c9b1b6e7f0c, started, etcd, http://0.0.0.0:2380,http://127.0.0.1:2380, http://0.0.0.0:2379,http://127.0.0.1:2379, false
-
-
OSS:对象存储,用于构建索引、消息队列(可选)等。一般可以使用
minio/S3/GCS/Blob等;# Whether to useIAM role to access S3/GCS instead of access/secret keys
# For more information, refer to
# aws: https://docs.aws.amazon.com/IAM/latest/UserGuide/id_roles_use.html
# gcp: https://cloud.google.com/storage/docs/access-control/iam
# aliyun (ack): https://www.alibabacloud.com/help/en/container-service-for-kubernetes/latest/use-rrsa-to-enforce-access-control
# aliyun (ecs): https://www.alibabacloud.com/help/en/elastic-compute-service/latest/attach-an-instance-ram-role
useIAMfalse
# Cloud Provider of S3. Supports: "aws", "gcp", "aliyun".
# Cloud Provider of Google Cloud Storage. Supports: "gcpnative".
# You can use "aws" for other cloud provider supports S3 API with signature v4, e.g.: minio
# You can use "gcp" for other cloud provider supports S3 API with signature v2
# You can use "aliyun" for other cloud provider uses virtual host style bucket
# You can use "gcpnative" for the Google Cloud Platform provider. Uses service account credentials
# for authentication.
# When useIAM enabled, only "aws", "gcp", "aliyun" is supported for now
cloudProvideraws-
OSS选择minio组件。minio组件采用docker安装方式,其
docker-compose.yaml如下:services
minio
imageminio/minioRELEASE.2024-12-18T13-15-44Z
container_nameminio
restartunless-stopped
environment
MINIO_ROOT_USER$MINIO_USER # MINIO_USER、MINIO_PASSWORD、UID和GID可以采用.env来设置
MINIO_ROOT_PASSWORD$MINIO_PASSWORD
ports
"9000:9000"
"9001:9001"
volumes
$HOME/works/minio/data:/data
commandserver /data --console-address ":9001"
user"${UID}:${GID}"
deploy
replicas1
restart_policy
conditionon-failure
delay10s
max_attempts3
update_config
parallelism1
delay10s
resources
limits
cpus'0.5'
memory512M
logging
driver"json-file"
options
max-size10m
max-file"3"
networks
sheinnet_18
minio_network
networks
minio_network
driverbridge
sheinnet_18
externaltrue -
检验是否安装成功,运行下面命令:
 curl -I http://localhost:9000/
 或
 mc alias set myminio http://localhost:9000 accessKey secretKey
mc ls myminio/ -
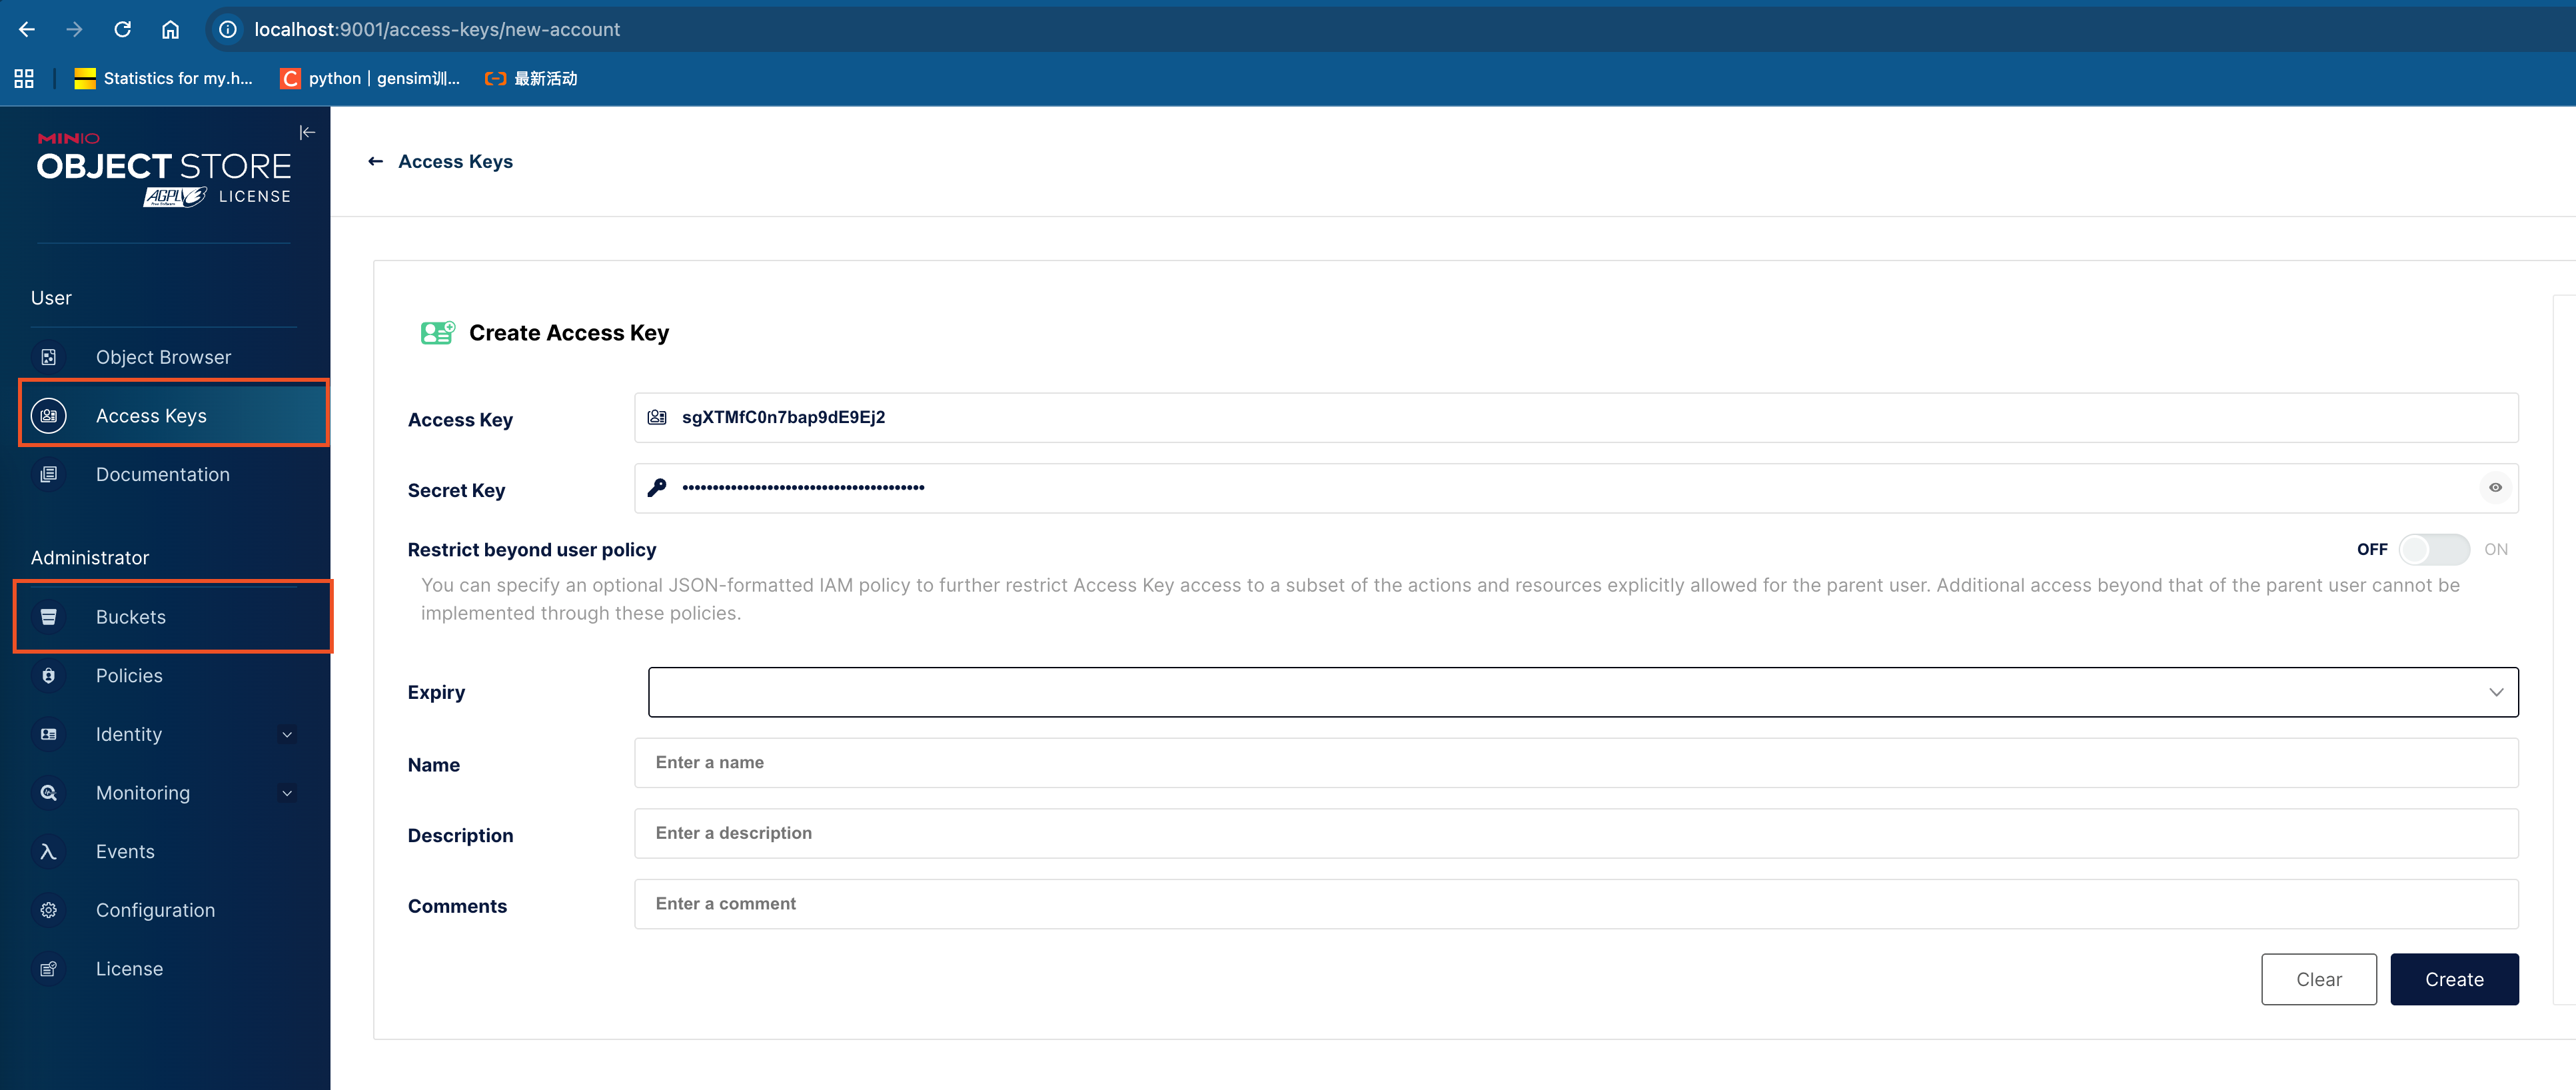
确认成功后,进入minio后台,建立bucket名称为
milvus,并创建accessKey和secretKey,如下图:
-
-
mq:消息队列,用于实时向量更新。可选择的有
pulsar,kafka,rocksmq,woodpecker,默认pulsar。# Milvus supports four message queues (MQ): rocksmq (based on RocksDB), Pulsar, Kafka, and Woodpecker.
# You can change the MQ by setting the mq.type field.
# If the mq.type field is not set, the following priority is used when multiple MQs are configured in this file:
# 1. standalone (local) mode: rocksmq (default) > Pulsar > Kafka > Woodpecker
# 2. cluster mode: Pulsar (default) > Kafka (rocksmq is unsupported in cluster mode) > Woodpecker
# Note: These MQ priorities are compatible with existing instances. For new instances, it is recommended to explicitly use Woodpecker to achieve better performance, operational simplicity, and cost efficiency.
mq
# Default value: "default"
# Valid values: [default, pulsar, kafka, rocksmq, woodpecker]
typewoodpecker
enablePursuitModetrue # Default value: "true"
pursuitLag10 # time tick lag threshold to enter pursuit mode, in seconds
pursuitBufferSize8388608 # pursuit mode buffer size in bytes
pursuitBufferTime60 # pursuit mode buffer time in seconds
mqBufSize16 # MQ client consumer buffer length
dispatcher
mergeCheckInterval0.1 # the interval time(in seconds) for dispatcher to check whether to merge
targetBufSize16 # the lenth of channel buffer for targe
maxTolerantLag3 # Default value: "3", the timeout(in seconds) that target sends msgPack-
mq选择使用kafka组件,kafka组件采用docker安装方式,其
docker-compose.yaml如下:services
zookeeper
imagemilvusdb/zookeeper3.7.0
container_namezookeeper
restartunless-stopped
environment
ALLOW_ANONYMOUS_LOGIN=yes
ports
"2181:2181"
volumes
./zookeeper_data:/bitnami/zookeeper # 注意建立./zookeeper_data目录
logging
driver"json-file"
options
max-size10m
max-file"3"
networks
sheinnet_18
kafka
imagemilvusdb/kafka3.1.0
container_namekafka
depends_on
zookeeper
restartunless-stopped
environment
ALLOW_PLAINTEXT_LISTENER=yes
KAFKA_CFG_ZOOKEEPER_CONNECT=zookeeper:2181
KAFKA_CFG_LISTENERS=PLAINTEXT://0.0.0.0:9092
KAFKA_CFG_ADVERTISED_LISTENERS=PLAINTEXT://localhost:9092
ports
"9092:9092"
volumes
./kafka_data:/bitnami/kafka # 注意建立./kafka_data目录
logging
driver"json-file"
options
max-size10m
max-file"3"
networks
sheinnet_18
networks
sheinnet_18
externaltrue
-
检验是否安装成功,运行下面命令:
 # 创建topic
 docker exec -it kafka /opt/bitnami/kafka/bin/kafka-topics.sh --create --topic test --bootstrap-server localhost:9092 --partitions 1 --replication-factor 1
 # 生产消息
 docker exec -it kafka /opt/bitnami/kafka/bin/kafka-console-producer.sh --topic test --bootstrap-server localhost:9092
 # 消费消息
 docker exec -it kafka /opt/bitnami/kafka/bin/kafka-console-consumer.sh --topic test --from-beginning --bootstrap-server localhost:9092
-
Milvus组件安装
-
官方下载RPM包,并安装:
 # 本地是arm芯片机器,故下载arm64的包;若是x86_64,则下载对应的包即可
 wget https://github.com/milvus-io/milvus/releases/download/v2.6.4/milvus_2.6.4-1_arm64.rpm -O milvus_2.6.4-1_arm64.rpm
 dnf install milvus_2.6.4-1_arm64.rpm -y
-
增加配置:测试时,所有角色采用了一份配置,实际生产环境可以拆开。
-
:根据实际情况填写其内容。
-
:日志配置。
-
-
角色运行:
-
mixcoord运行:milvus run mixcoord -
datanode运行:milvus run datanode -
streamingnode运行:milvus run streamingnode -
querynode运行:export ETCD_ENDPOINTS="http://10.100.46.202:2379"
export METRICS_PORT=9091
milvus run querynode -
proxy运行:export ETCD_ENDPOINTS="http://10.100.46.202:2379"
export METRICS_PORT=9091
milvus run proxy
-
